Study Shelving
This was the firs project for the study/library master plan of making a set of bookshelves in the hallway nook and making desks for our oddly shaped study. Before I could start on those projects I needed to do something to get me some extra storage space. Wendy and I moved the bookshelf that was currently in the study (and was going to move anyway) into our bedroom (after removing the books) and then adding these shelves gave us the space we needed so that when I started on the desks, the desks would be empty enough to easily move.
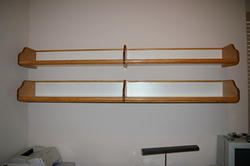
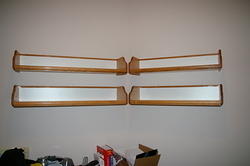
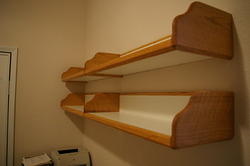
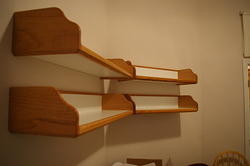
The design of the shelves is 3/4" melamine, edged with oak. I joined everything using biscuts. The ends are solid oak as well.
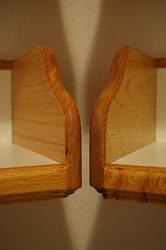
The way I made the ends is I cut one with a jig saw, actually a few times until I got the shape I wanted, and then used a straight router bit with a template roller to cut the rest to match. That worked out really well.
What didn't work so well was the routing of the edge pieces. The way I had everthing designed, I had to do half the routing before assembly and half afterwards. For the half that was before, I had to very precisely end the routing at specific locations along the wood. This worked well except for the burning I got on the wood as I slowed down to end at the correct spot. The post-assembly routing was far worse. It was very awkward, particularly with the double length shelves. I made one significant error (thankfully it was able to be mostly covered with excessive sanding) and the rest was not nearly as clean as I hoped.
I did learn one thing during post assembly routing: making multiple passes and only taking part of the edge off each time helped. It helped both ensure the wood didn't peal off and chip and also made it easier to control.
For a finish I used clear polyurethane that I sprayed with a HVLP spray gun and it worked great. I used masking tape and bags to cover the melamine while spraying.
Finally to mount it to the wall, I used a key-hole cutting router bit into the back piece of melamine matched to where the studs were on the wall and then used 1/4" bolts into the studs to mount from. I was really worried about everything lining up right and while it was slightly challenging, it worked out surprisingly well.
Overall things went pretty darned well on this project and it proved a lot of the concepts (melamine with oak edging) I am planning on using on the desks.
The design of the shelves is 3/4" melamine, edged with oak. I joined everything using biscuts. The ends are solid oak as well.
The way I made the ends is I cut one with a jig saw, actually a few times until I got the shape I wanted, and then used a straight router bit with a template roller to cut the rest to match. That worked out really well.
What didn't work so well was the routing of the edge pieces. The way I had everthing designed, I had to do half the routing before assembly and half afterwards. For the half that was before, I had to very precisely end the routing at specific locations along the wood. This worked well except for the burning I got on the wood as I slowed down to end at the correct spot. The post-assembly routing was far worse. It was very awkward, particularly with the double length shelves. I made one significant error (thankfully it was able to be mostly covered with excessive sanding) and the rest was not nearly as clean as I hoped.
I did learn one thing during post assembly routing: making multiple passes and only taking part of the edge off each time helped. It helped both ensure the wood didn't peal off and chip and also made it easier to control.
For a finish I used clear polyurethane that I sprayed with a HVLP spray gun and it worked great. I used masking tape and bags to cover the melamine while spraying.
Finally to mount it to the wall, I used a key-hole cutting router bit into the back piece of melamine matched to where the studs were on the wall and then used 1/4" bolts into the studs to mount from. I was really worried about everything lining up right and while it was slightly challenging, it worked out surprisingly well.
Overall things went pretty darned well on this project and it proved a lot of the concepts (melamine with oak edging) I am planning on using on the desks.