Construction and Design
(AFTER READING TEXT SCROLL DOWN TO SEE THE PICTURES!!!)
This train table was designed with a few difficult requirements:
-Must be small enough to get in attic
-Must not hinder the ability to easily decorate the tree
-Must be indestructible from a toddler's perspective
When pondering how to meet these requirements, the first idea that came to mind was that I could have a removable bridge behind the tree so that I could slide the table into place after the tree was up and then replace the bridge to complete the loop of track. Although I could probably do this at ground level, it seemed kind of tacky to have a bridge on the ground (and tackily designed stuff does not sit well with Crawfords). With that realization, I realized that I needed to have an elevated track. Going further, I decided that I would have a lot more future landscaping flexibility if the bridge was physically higher than the tree stand. I could do things like make a "lake" above the tree stand and have the bridge go across the lake!
After I did some measurements I decided I needed a bridge 7 1/2 inches over the table surface to be sufficiently higher than the tree stand for future landscaping flexibility. After talking to my dad (a model train expert) he advised me that it takes a lot of track to elevate 7 1/2 inches. He suggested a maximum grade of 3% which would require over 40 feet (ouch!) of track to go both up and down. But, he said, you could buy the train and see how steep of a grade it could take. After buying the train and doing the necessary tests I realized that I could do up to a 10% grade (phst, 3%... whatever!) but that a 6% grade was more reasonable. That got me down to 20 feet of track. Nevertheless, it was clear that I wasn't going to fit 20 feet of track on a table small enough to fit in the attic. This meant that I either had to drastically reduce the magnitude of the project or step things up a notch and make a table that broke down into multiple sections. If you're at all uncertain which path I took, you REALLY don't know what being a Crawford means. Again, I went to the expert to see the best way to accomplish this. The best way, he said, was to just line things up and have brackets to connect the pieces. However, there won't be any electrical connections... Ugh!
I already knew that I had to do some "creative" wiring for the removable bridge, but now that "creativity" was going to have to extend to the whole table. After careful consideration, I realized that I already had an electrical path across the sections: the metal bracket I planned to connect them with! All I had to do was solder some wires to each side of the bracket (or its receptacle) and I'd have the wiring built in.
And with that, we arrived at the design you see before you. Overall, the project went well although it took much more time than I thought. One of the biggest learnings was that grading is VERY hard to get right particularly so that the train won't derail.
One doesn't think about how much a flat surface simplifies matters until one tries to create a track with an elevation change. Normally there are only two ways to setup a track with derailment problems: Not have the track sections line up or have a turn with too tight a radius. When putting track on a grade, not only does the lining up the track issue become more difficult but you add two new problems: The track being flat from a side to side perspective and the grade being consistent or smoothly transitioning.
The first derailment problem I found was that at the bridge the train was coming off the track. This was because the bridge was flat but the track leading up to it was a 6% grade. As the train was transitioning from either the upward grade to flat or from flat to the downward grade, the front wheels of the engine would lift off the track. I fixed this by rounding the grade so that it transitioned from a 6% grade to flat over a 12" section (this was much more difficult to do post construction than during the design phase by the way). For others trying to duplicate this feat I'd recommend using the metric of 1% every 3" for G-scale model railroads or in my case 18" for 6% to flat as 12" although workable is on the marginal side of acceptable. Which brings me to my second problem...
The second problem I had was that the train would rock from side to side on various parts of the track. While this wouldn't derail the track of its own right, coupled with the grade transition problems would cause an occasional derailment. It turns out that the track wasn't always completely flat and would lean from side to side at various parts of the track. This was because my trusses weren't always perfectly aligned and would create little ruts that often only affected one rail of the track. In addition, it turned out that the bridge was a couple degrees off of flat. I was able to solve these problem with shims, but it just goes to show how much harder it is to have true and flat track on a grade than it is on a flat surface.
In any case, the overall project was a success and for the most part my copious planning paid off (including diagramming the track in Visio) and led to a mostly error free construction, grading problems aside. Tune in next year when I add landscaping. While this year the first two requirement drove the design (outside of the tighter than usual (4") truss spacing for strength), I expect that the "Toddler proof" aspects will drive the landscaping. Paper-mache just won't cut it. Fiberglass-mache perhaps?
-
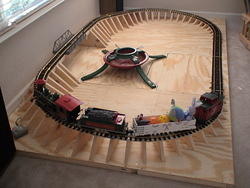
View of table that shows elevation change well
-
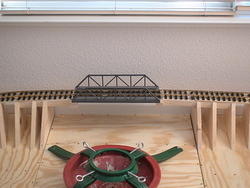
Shows bridge section in relation to tree stand
-
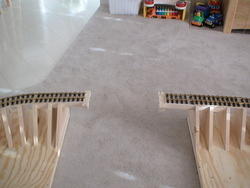
Shows table with bridge missing so it can slide past the tree
-
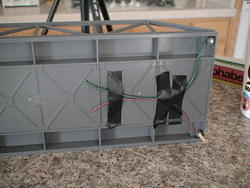
Show electrical wiring under bridge
-
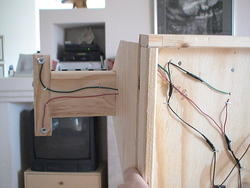
Shows electrical wiring from table to bridge.
-
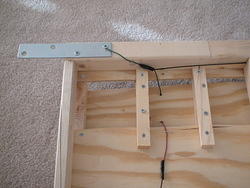
Shows electrical between panels. Notice the brackets are used as electrical connectors as well as for physically connecing sect
-
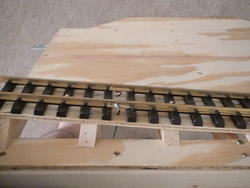
Shows electrical wiring from table to track. Also good picture of trusses.
-

Shows electrical wiring for "throttle" (transformer)
-
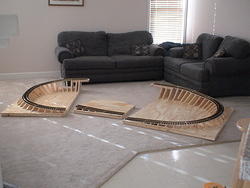
Shows three pieces separated.